Minilab3 Documentation

Overview
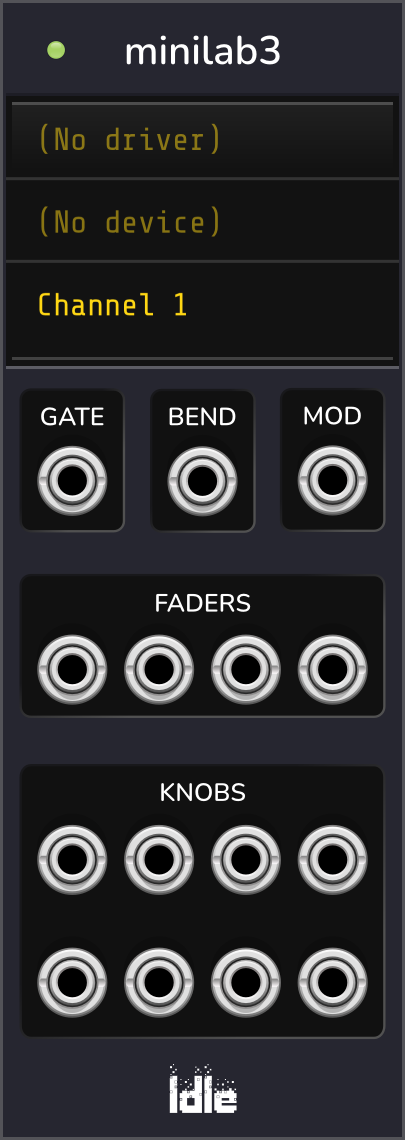
The MiniLab3 module collection provides virtual control surfaces by selectively routing and multiplexing MIDI signals to the primary module or currently active expander modules. Expander modules are activated by pressing the associated pad on your MiniLab3. Each expander module maintains its own independent knob, pitch bend and mod wheel values.
With this collection, you can independently control many more VCV modules than before.
- MiniLab - Where MIDI is routed by default.
- MiniPad - Where MIDI is routed when the associated pad is pressed.
- MiniLog - A diagnostic module for monitoring MIDI messages.
Feature Summary
- Selectively route MIDI through expander modules
- Multiplex MIDI by activating multiple expanders
- Maintains independent output values for each module
- Gate output on each module is high when it’s active
- Configurable output ports:
- Voltage range
- Encoder resolution and turn strength
- Slew limiting
Before getting started, check out Configure Your Hardware. Your MiniLab3 needs some changes to its knobs and pads to work with these VCV modules.

MiniLab Module
This module receives MIDI by default. It’s exclusive, so any activated MiniPads cause this module to go quiet (except for Faders).
Faders always come through, even if there’s an active MiniPad.
Operation:
- First, configure your hardware
- Select your MIDI driver, device and channel.
- Connect outputs to other VCV modules
- Use your MiniLab!
Channel 16 is reserved for pad MIDI. If you try to select it, 'All Channels' will be selected instead.

MiniPad Module
Expander module that provides multiplexed MIDI when activated.
It has its own independent bend, mod and knob values which stick around even while deactivated.
Unique Connections:
VEL- Initial press velocityTOUCH- Ongoing pressure
Operation:
- Place the module to the right of MiniLab or other MiniPad
- Connect outputs to other VCV modules
- Hold down the corresponding pad on your MiniLab3
- Use your MiniLab.

MiniLog Module
Diagnostic module for monitoring MIDI communication.
Operation
- Place to the left of the MiniLab module.
Configure your hardware
Before getting started, make sure to use Arturia’s MIDI Control Center to make the following changes to your MiniLab3’s configuration.

Pad Configs
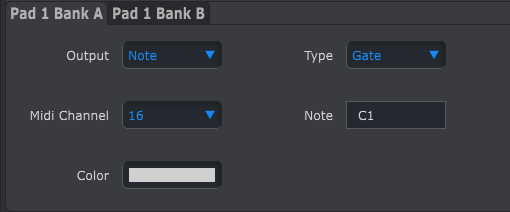
Each MiniPad module is activated by an octave of C or D on channel 16.
Bank A: Pad 1 should send C1, Pad 2 should send C2, etc.
Bank B: Pad 1 should send D1, Pad 2 should send D2, etc.
All on channel 16!

Knob Configs
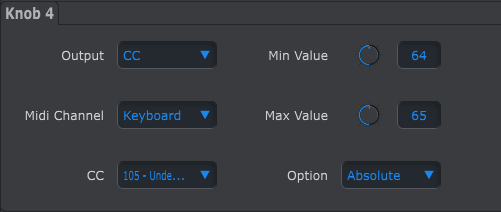
Each knob is associated with a different control code and sends a single value for left and right in Absolute Mode.
Knob control codes: 102 - 109
Send values:
- Min Value: 64
- Max Value: 65

Fader Configs
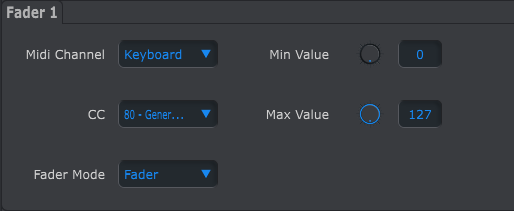
Each fader is associated with a different control code.
Fader control codes: 80, 81, 82, 83
Output Ports
Right-click a port to customize its options.
Double-click it to reset its current value.
Voltage Range:
Every port is either unipolar or bipolar based on its voltage range.
- Unipolar: 0-1V, 0-5V, 0-10V
- Bipolar: ±1V, ±5V, ±10V
Slew Limit:
Every port can have a limited rate of change. A larger slew limit means a slower rate of change.
Resolution (knob only):
This sets how many notches the knob has.
Turn Speed (knob only):
How many notches (see resolution above) to turn per MIDI CC.
Tips
- Adjust voltage ranges to match your modules
- Use slew limiting for smooth transitions
- Configure encoder resolution and speed to taste
Why can’t I use Channel 16?
Channel 16 is reserved for communicating with your MiniLab3’s pads.
Why not multiplex the faders?
Knobs have rotational symmetry. As you change between pads, it doesn’t matter what the knobs current values are. The physical knob can’t be out of sync.
With faders, it’s different. When switching between pads, the fader values might not correspond with where they are physically.
Why is there no V/OCT, etc?
Use the Fundamental MIDI > CV module for that!